you can hard factory reset tecno android phone
when it refuse to come up or just stuck on logo display.do you have a
tecno android phone that is refusing to come up or after switching it
On, it keeps restarting it self or bootloops or just showing the tecno
logo and you don't know what to do.guess the next option is to take it
to a mobile phone engineer to fix it for you.well, before doing that,
there is some thing you should first of all try to fix the problem and
it is called hard factory reset android phone,tecno android is not excluded in this set up.you can hard factory reset your tecno android phone when it refuse to come up, whether the phone is running android OS version2.3, 4.0 ,4.2 etc, you can still hard factory reset
it.this option is available on almost all mobile phone running android
OS.but they all have different pattern at which you can enter the factory reset
mode via their stock recovery.so if you are stuck with bootloop, phone
refuse to come up or stuck at logo display, then you can hard factory reset the android phone. for the purpose of this tutorial, we shall make use of tecno android
phone.so if your tecno android phone is showing only the logo,or it is
stuck on white screen,all you need to do is to enter recovery mode and
perform factory reset. for those who don't know what recovery mode is.stock recovery is an
option that is inbuilt on the phone which enables one to perform task
like wiping the phone data,clearing delvic catches,factory reset the
phone to it normal state.so with such option available on your android
phone,if the phone is having problem that has to do with the operating
system,then you can use the recovery mode and any option you see there
to fix it if you have knowledge on what each option does. you may like to read reason why your andriod phone get bricked/damage how to hard factory reset tecno android phone when it refuse to come up ==> switch off the phone and remove the battery, then insert it back ==> hold the following buttons volume up button and then power ON at the same time. ==> keep holding it until you see a setup showing on the screen. the setup is known as recovery mode.there you will see different option,just scroll to the option "data wipe/factory reset". to scroll,use volume down button and select it using volume up button or power ON button it will ask you to confirm if you really want to hard factory reset the phone,choose yes to all. ==> it will start the process,just relax and wait for it to complete
the process.after it has been completed, it will bring up the normal
setup for you to configure just like the way you configured it when you
bought the phone.do that and it is resolved. if the phone could not enter the recovery mode after several
attempt,then it maybe that the phone has an hard brick problem.but you
just have to keep trying because some time it may not enter recovery
mode on first or second attempt.if the issue is not resolved,then you
should take it to a mobile phone engineer to check it for you.that's
all, ENJOY. visit www.gurubest.com to view the latest post update you are not seeing right now. more articles update is posted on gurubest every day,so don't be the last to get update to your email.Subscribe by email DON'T FORGET TO SHARE WITH YOUR FRIENDS ON FACEBOOK BY CLICKING THE SHARE BUTTON.
Friday, 19 September 2014
How to Use Photoshop: The Ultimate Guide for the Design-Impaired Marketer
In the current day and age of marketing, it’s no secret that visual
content is an essential part of any successful marketing campaign. Many
marketers have learned that not only does visual content catch the
attention of our audience, it also happens to spread like wildfire on
social networks.
So, why aren’t more companies jumping on the visual content train? Well, there are three big reasons: ability, time, and budget.
Most marketing teams don’t have a full time graphic designer on the
team -- that means you have to either hire a freelancer or agency, or
invest some serious time into learning how the heck to create
your visual content in-house. And if you're anything like most marketers
out there, the first time you opened Photoshop, you closed it after
five minutes and decided to reach for your freelancer's phone number
(and your CMO's wallet), instead.
Thing is, Photoshop isn't as overwhelming as that initial experience
makes us all think! That's why I decided to create this guide to
Photoshop ... because after fiddling around with it for years, I've been
in your shoes, and want to show you how easy it can be if someone just
explains it in plain English.
Now, it wouldn't be realistic to guarantee that you'd be a Photoshop
wiz by the end of this guide -- but that isn’t what it’s designed to do.
The goal is to provide you with the understanding you’ll need to
use the powerful tools in Photoshop, in a timely, efficient,
non-hair-pulling manner, so you can elevate your visual marketing, like, today. Sound good? Alright, let’s jump right into the core elements you need to know about Photoshop.
How to Use Layers in Photoshop
If any of you have dabbled in Photoshop, you understand how
frustrating it can be if you don’t know how the layers work. This is by
far the most important element of Photoshop, and in my opinion, one of
the reasons many people throw their arms up in frustration -- but once
you understand how they work, they'll make your life much easier.
I like to think of layers as sheets of glass stacked on top of one
another that you'll use to create a final product. Each sheet can be
modified individually without affecting the project as a whole; this can
save you tons of time when making edits to individual elements of your
graphic. A layer can be used for an image, text, brush strokes,
background colors, patterns, and filters.
To add or delete a layer, you can either use the Layers tab from the
top menu bar and select your option, or you can locate the Layers module
on the right hand side of your Photoshop application and use the
corresponding icons. Once you've located your Layers tool bar, you'll
notice a number of icons along the bottom of that module. The add and
delete icons are indicated by the screenshot below. You will also notice
the little "eye" icons along the left side of each layer you add;
clicking these icons lets you toggle the visibility of those layers.
Tip: Always, always, always name
your layers! Keeping them organized will help keep you sane, especially
if you find yourself working on a project with a large number of layers.
It gets pretty hard keeping track of layers 1-10 when you have no idea
which layer contains which graphics.
How to Use the Color Tool in Photoshop
This may seem like a pretty self-explanatory element, but the Color
tool in Photoshop has powerful features that will keep your visual
content vibrant and unify your color schemes. The Color tool is located
on the tool bar on the right, and lets you use, modify, copy, and save
custom colors for your content.
In the color module, there are a set of bars that you can adjust to
create your own custom color -- like if you already have a brand style
guide that defines the colors you should use. Or, you can use the quick
color selection bar located underneath the RGB bars to find the color
that's right for you. You'll notice that your selected color is
indicated by a small box shown in the screenshot below.
If you would like to use a more expansive color picker, simply double
click the the foreground color box, and you'll be presented with a much
more advanced color creating tool to work with. Within the Color
Picker, you'll be able to create your custom color and save it to your
swatches for future use. Tip: Take your company colors and save them as
“Swatches” so that you can reference and reuse them whenever you’re
designing your visual content.
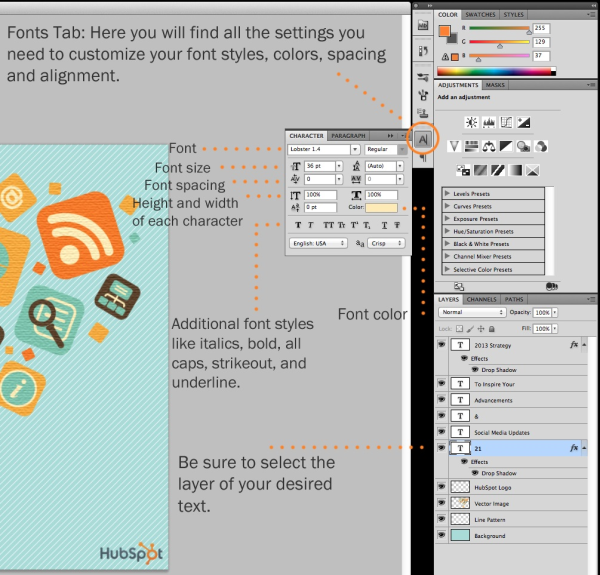
How to Use Fonts and the Text Tool in Photoshop
I love typography, and you should too! Fonts are a defining piece of
any marketer’s visual content. Let’s face it; an image of a teddy bear
in a box is just an interesting image until you define it with some
text. The great thing about the Photoshop Text tool is that it’s easy to
add custom fonts to your database, and it gives you access to advanced
font settings that give your text some serious style.
To access your font tools, click the icon indicated in the screenshot
below. You'll immediately notice all of the settings and font options
you have available at your finger tips. These settings let you change
the font, font size, spacing between characters, height, width, color,
and style. (Needless to say, you can do more with your font than you
really have to.)
The text tool works like any other text tool you’ve used. Click the
"T" icon on the left side bar, drag the text box over any particular
area you want text to appear, and you’re set to go. Whenever you create a text box, Photoshop will generate a layer for it. You can choose the color, size, stroke, font style, and a variety of other options to switch things up. Tip: You can download a variety of royalty-free custom fonts at www.dafont.com.
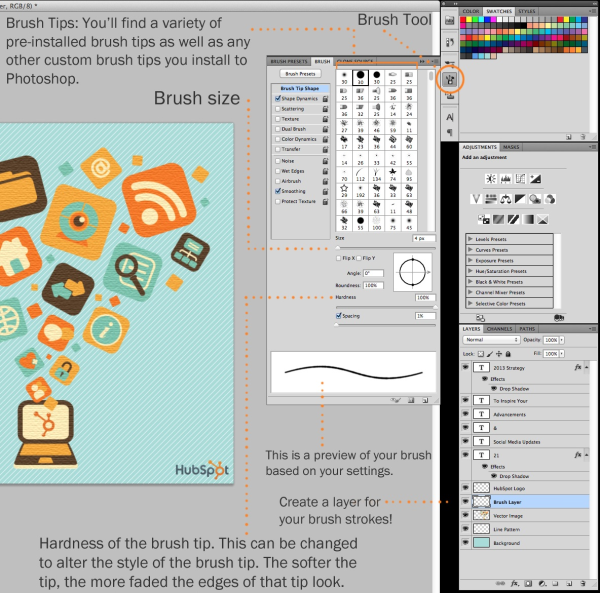
How to Use Brushes in Photoshop
Brushes are a great way to add some visual accents to your content.
Photoshop starts you off with a nice selection of brush tips that you
can use to clean up your graphics and create some basic visual effects.
Just as with fonts, you can add your own royalty-free custom brush tips.
With the brush settings, you can change the size, shape, and
transparency of your brush strokes to achieve a number of different
visual effects. Check out the screenshot below for a breakdown of the
brush settings. Tip: You can find royalty-free brushes at www.brusheezy.com. You know, if you want to get really creative.
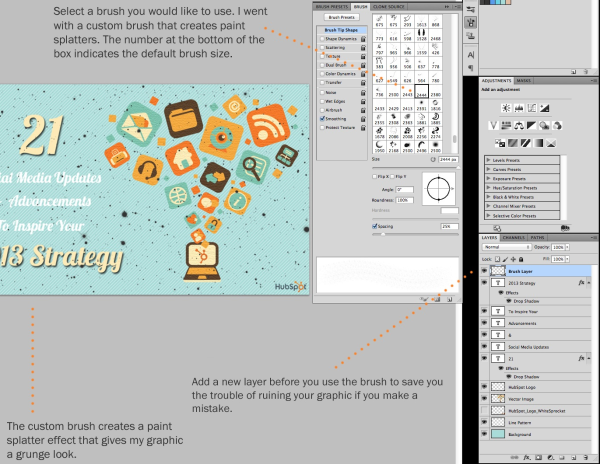
How to Use the Brush Tool in Photoshop
The brush tool, as mentioned earlier, is perfect for adding design
accents to your marketing content. When using the brush tool, I always
suggest adding a new layer to work with so you don’t paint over any of
your other elements. You can choose colors from your library of
swatches, or use a custom color. In the screenshot below, I’m using a
custom brush to add a splash of color and character to this graphic.
It’s a simple process that produces great results.
To access your the Brush tool, locate the icon indicated in the
screenshot (you'll also notice that the brush icon is also located in
the top left corner). The drop down will indicate your current brush
tip.
Changing the brush settings can give your brush a drastically
different look and style. Don’t be afraid to play around a bit with all
of your custom brushes. To make changes to your brush tip, locate the
settings icon on the side bar on the right; and a slide out menu will
appear, and you can make your changes as you see fit.
Once you're satisfied with your settings, create a new layer over the elements you'd like to paint and go to town!
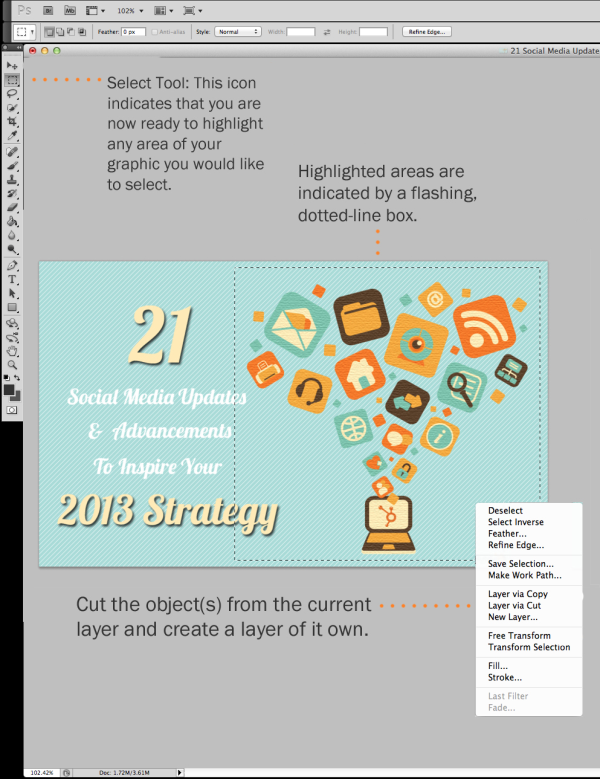
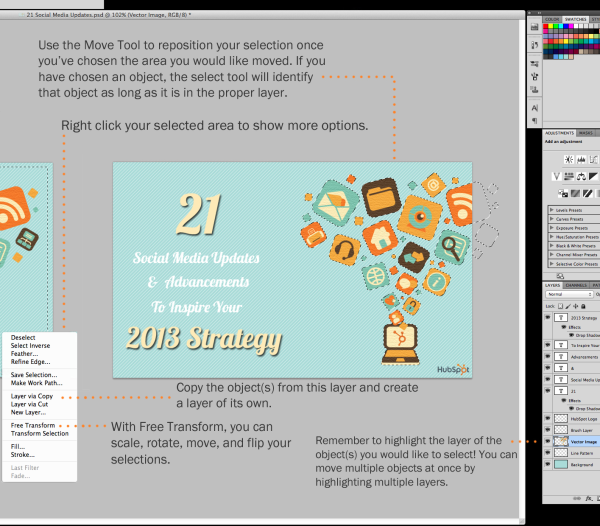
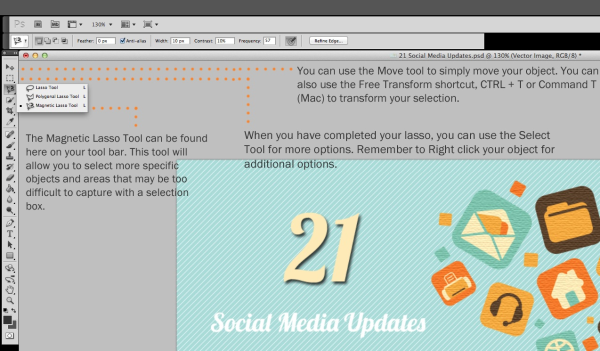
How to Use the Select Tool in Photoshop
If you’ve used any photo editing software, you’re probably well aware
of the Select tool. For Photoshop, this tool is represented by the
dotted-line square in your tool bar (you'll see this in the screenshot
below). This is one of the most basic, yet frustrating, tools to use in Photoshop.
When used correctly, this tool will let you select individual elements,
entire graphics, and determines what is copied, cut, and pasted into
your graphics.
The first thing you should know is that the Select tool will only
work if a layer is highlighted, as it is in the screenshot below. So, if
I want to cut or copy a piece of Layer 4, Layer 4 must be highlighted
in my Layer's tool bar. Once you remember to pay attention to what layer
you are working with, the Select tool becomes much easier to
use. Then, once you've highlighted your area of choice, just right click
and decide what you'd like to do from the pull out menu.
Some people also get hung up on how to select an image to insert in
their graphic. To do this, open the image you would like to use in
Photoshop, and use the Select Tool to determine how much of the image
you would like to copy. Once you’ve selected the area of the image,
simply copy the area. Open the tab for your current project and paste it
in as a new layer. Once you’ve pasted the image, you can position and
resize the image anyway you’d like. (Refer to the Move tool and Free
Transform in subsequent section of this post if you need more help on
this.) Tip: To select your entire graphic and include all
layers, highlight all layers and then use the Select tool. Once you've
determined the area to copy, use the menu bar at the top and click
"Edit," >> "Copy Merged." This will copy the entire graphic so you
can paste it as its own layer.
How to Use the Move Tool in Photoshop
This is a fairly basic tool that allows you to move individual
elements of your graphic. The Move tool works on individual layers, and
on the graphic as a whole -- if (remember how to do this?) you highlight
all of your layers. This tool comes in handy when you’re trying to
reposition images, text, and other design elements. Click the Move Icon
from the left hand menu bar and simply drag the object(s) you would like
to move. You can also right click the object for additional options. Tip: Use the shortcut CTRL + T or Command + T
(for Macs) to initiate Free Transform. This will let you scale, rotate,
move, and flip any element in your selected layer or layers. Hold the SHIFT key while transforming to maintain the proportions of your elements.
How to Use the Zoom Tool in Photoshop
Whether you think so or not, the Zoom tool will probably be the most
used tool of them all! I figure I won’t have to spend too much time
explaining what this tool does, but I will leave you with a couple
shortcuts that will make your day a heck of a lot easier. Tip: Hold ALT or Option (Mac) while scrolling to zoom in and out. Hold CRTL or Command (Mac) while scrolling to scroll from left to right.
How to Use the Magnetic Lasso in Photoshop
Have you ever wished you could just select a particular shape,
person, or object instead of having to highlight the entire image? Well,
the Magnetic Lasso will do the trick! You can access the Magnetic Lasso
from your tool bar. Simply click it, and start selecting your custom
object by guiding your cursor along the outside of the object -- the
Magnetic Lasso will snap to it like, well, a magnet. Use your zoom tool
to get up close and personal with your object, too, for more accurate
lasso work. Once you’ve finished highlighting your object, right click
and copy or cut it out. Tip: Don’t expect a perfect selection each time.
Sometimes the Magnetic Lasso may mistake shadows or textures as part of
your object, and cut off pieces of your object. If you can afford some
extra space around the object, use the Lasso Tool instead and erase the
unwanted selections afterwards.
How to Use the Eraser in Photoshop
The eraser is one of the most useful tools in Photoshop. Yes, I
understand it’s technically just an eraser, but you’ve never used an
eraser like this!
First off, we’ve got the basic eraser, which functions a lot like the
brush tool. You can change the size and hardness of the eraser tip to
achieve a variety of effects, like blending and fades. To use the Erase
tool, locate the icon on the right-hand tool bar and select it. Once
you've selected your Eraser tool, you can change the size, hardness, and
other aspects of that erase tool by clicking on the drop down tab in
the top menu bar, indicated by the screenshot. Like most tools in
Photoshop, the eraser works only on a specifically selected layer. Make
sure you've got the layer you want selected before you start erasing!
What I use most is the Background eraser, which uses differences in
color to help you erase unwanted background areas from your images. This
tool is a time-saving wonder! You can see how easily it eliminates
background colors from images. This is especially helpful if you need an
object with a transparent background.
To use the Background eraser, click and hold the eraser icon until
the slide out menu appears. Once you've located the Background eraser
icon, pictured in the screenshot, click it. Now you're ready to to some
serious erasing! Adjust the size of the Background eraser, and simply
click the color you would like deleted from the selected layer. Tip: Don’t be afraid to use an oversized eraser tip
for the Background eraser. Since it works by removing particular colors
from the image, it won’t erase colors that aren’t selected.
How to Use the Crop Tool in Photoshop
This works like any crop tool you’ve ever encountered. Simply choose
your area and crop it out! I know this is a basic tool, but you’ll find
yourself using this just as often as any other tool in Photoshop,
especially when you’ve completed your graphic and need to clean up some
of the free space around the edges.
To use the Crop tool, select the icon indicated in the screenshot
from the side menu bar, and drag the box over the area you would like to
crop. To adjust the crop box, simply click and drag the small anchor
boxes on the sides and corners of the crop box. Tip: You can make your canvas size larger than it
needs to be so that you can give yourself more room to move your design
elements, and crop it down to the proper size afterwards.
How to Use the Paint Bucket in Photoshop
This tool is perfect for giving your marketing content some much
needed color, and a nice background off of which to build your graphics.
There are three tools built into the Paint Bucket that a marketer
should learn how to use. The first is the basic Paint Bucket tool, which
essentially fills any solid area with the color of your choice. It’s
great for solid backgrounds or coloring large areas.
To use the Paint Bucket tool, simply select the icon from the side
menu bar as indicated in the screenshot, and find the color you would
like to paint. Once you've found the color you'd like to use, select the
appropriate layer and apply the color by clicking the area you would
like painted.
The Paint Bucket can also be used to apply patterns to your images.
These patterns can be manually created if you have the time and
patience, or you can find a variety of royalty-free patterns available for download through a basic Google search.
To use the Paint Bucket to apply a pattern, select the paint bucket
icon from the side menu bar and use the drop down tab from the top menu
bar to change the foreground to "Pattern" as indicated in the screenshot
below. Once you've changed the tab over to "Pattern," you will notice a
new tab appears to the right of that "Pattern" tab. Select that new
pattern box and choose your pattern from the drop down box. You have now
chosen a pattern, and are now ready to apply that pattern to whichever
layer you would like.
The third feature of the paint bucket is the Gradient tool. This can
be used to create a nice faded background effect of the color of your
choice. It’s a simple tool that’s easy to use, and produces a nice
professional look for your marketing content.
To use the Gradient tool, click and hold the paint bucket icon until
the slide out menu appears. Select the Gradient tool and make sure that
the Gradient tab in the top menu bar is set to a gradual face, as
indicated in the screenshot above. Now, choose the color you would like
to use, place your cursor on the right side of the graphic, and drag to
the left.
How to Use the Eyedropper in Photoshop
This handy little tool lets you simply extract and use any color from
any image in Photoshop. It’s perfect for keeping your marketing content
uniform with company color schemes. To use the Eyedropper tool, select
the icon from the sidebar as indicated in the screenshot. Locate that
color you would like to extract, and simply click that area to clone the
color. Once you've extracted the color, you will see it indicated at
the bottom of the left sidebar. You can double click that color box to
bring up the advanced color picker where you can adjust and save the
color to a swatch for future use.
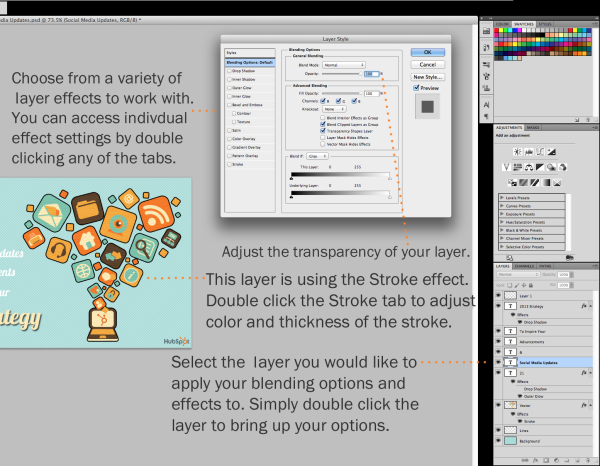
How to Use Blending Options in Photoshop
The blending options are great for putting finishing touches on your
marketing content. You can access these options by right-clicking the
layer you want to use and selecting “Blending Options” from the menu.
You can also double click any layer to bring up the options for that
particular layer. You’ll notice in the screen shot below that there are
quite a number of features you can use. You should take some time to
play around with all the layer effects and find out which ones tickle
your fancy.
With the variety of options available, you can achieve a number of
great effects to finalize your graphics. Have fun with these and
experiment on different layers, images, and texts.
Before we end, I'd like to add one last tip for marketers with a
limited budget and a tight schedule: Save yourself tons of time and
money by using services like iStockphoto. They provide creative
professionals with a huge selection of images and illustrations for
purchase so you don't have to start all your design work from scratch.
Most of us barely have enough time to put together our visual content,
which means it's most likely out of the question to draw and illustrate
our graphics from scratch, am I right? You can purchase some great
images and illustrations, download them straight to your computer, and
open them in Photoshop where you can apply all of the techniques and
tips we covered in this guide.
Grand Theft Auto Cheat Code Instructions: In order to
enable cheat mode for Grand Theft Auto San Andreas Cheats just enter one
of the following codes during game play to activated the desired
effect. You should receive a message stating that Cheat Activated.
Codes are listed in ALL CAPS but can be typed in upper or lower case. Cheat/Effect - CODE
Adrenaline Mode - MUNASEF
Aggressive Drivers - YLTEICZ
All Cars Have Nitro - SPEEDFREAK
All Green Lights - ZEIIVG
Always Midnight - NIGHTPROWLER
Beach Party - CIKGCGX
Black Traffic - IOWDLAC
Blow Up All Cars - CPKTNWT
Boats Fly - FLYINGFISH
Cars Float Away When Hit - BUBBLECARS
Cars Fly - RIPAZHA
Chaos Mode - STATEOFEMERGENCY
Clear Wanted Level - ASNAEB
Elvis is Everywhere - BLUESUEDESHOES
Everyone is armed - FOOOXFT
Faster Clock - YSOHNUL
Faster Gameplay - SPEEDITUP
Fat - BTCDBCB
Foggy Weather - CFVFGMJ
Full Weapon Aiming - OUIQDMW
Funhouse Theme - CRAZYTOWN
Gang Members Everywhere - ONLYHOMIESALLOWED
Gangs Control the Streets - BIFBUZZ
Have a bounty on your head - BAGOWPG
Have Jetpack - ROCKETMAN
Have Parachute - AIYPWZQP
Hitman In All Weapon Stats - PROFESSIONALKILLER
Huge Bunny Hop - CJPHONEHOME
Increase Wanted Level Two Stars - OSRBLHH
Invisible Car - WHEELSONLYPLEASE
Max All Vehicle Skill Stats - NATURALTALENT
Max Muscle - BUFFMEUP
Max Respect - WORSHIPME
Max Sex Appeal - HELLOLADIES
Mega Jump - KANGAROO
Mega Punch - IAVENJQ
Never Get Hungry - AEDUWNV
Never Wanted - AEZAKMI
Ninja Theme - NINJATOWN
Orange Sky - OFVIAC
Overcast Weather - ALNSFMZO
Peds Attack Each Other, Get Golf Club - AJLOJYQY
Peds Attack You With Weapons, Rocket Launcher - BGLUAWML
Can't make it past a certain mission in Grand Theft Auto Vice City?
Before utter frustration sets in or if your just looking to have some
more fun, you may want to take a look at the Grand Theft Auto Vice City
cheat codes.
While many people are up for the challenge of trying to beat a
video game on their own with out any help, many simply don't have the
patience to beat a game without the help of some cheat codes. While
others may just be looking to add new life to an old game or have fun
with it.
The Grand Theft Auto Vice City cheat codes listed below are for
the PC version of the game and include cheats for health, weapons,
vehicle and general game play cheats. In addition to these cheat codes,
there is also links to video walkthroughs and cheats for other
platforms.
Grand Theft Auto Vice City Cheat Codes
For desired affect enter the cheat code listed in bold anytime during game play.
Health & Weapons Cheat Codes
aspirine - Max health canttakeitanymore - Suicide thugstools - Thug Weapons professionaltools - Professional weapons nuttertools - Heavy weapons preciousprotection - Full armor youwon'ttakemealive - Increase wanted level leavemealone - Decrease wanted level
Vehicle Cheat Codes
bigbang - Destroy all cars wheelsareallineed - Strip cars comeflywithme - Flying dodo car greenlight - All traffic lights are green miamitraffic - Traffic moves faster travelinstyle - Flying car panzer - Spawn a tank thelastride - Spawn a hearse rockandrollcar - Spawn a limo rubbishcar - Spawn a garbage truck gettherefast - Spawn a sabre turbo betterthanwalking - Spwan a caddy gettherequickly - Fast car getthereveryfastindeed - Faster car getthereamazinglyfast - Fastest car iwantitpaintedblack - Black traffic seaways - Cars float on water gripiseverything - Improved car handling ahairdresserscar - Pink cars loadsoflittlethings - Change wheel size
General Game Play/Character Vice City Cheats
apleasantday - Nice weather alovelyday - Great weather abitdrieg - Cloudy weather catsanddogs - Rain cantseeathing - Fog lifeispassingmeby - Speed up game stilllikedressingup - Change pedestrian clothes fightfightfight - Pedestrian riot nobodylikesme - Pedestrians attack you ourgodgivenrighttobeararms - Pedestrians have
weapons onspeed - Walk faster booooooring - Walk Slower chickswithguns - Bikini women with guns chasestat - See wanted stats fannymagnet - Tommy groupies certaindeath - Tommy starts smoking deepfriedmarsbars - Tommy is fatter programmer - Tommy has thing arms and legs hopingirl - Pedestrians get in your car cheatshavebeencracked -Play as Ricardo Diaz looklikelance - Play as Lance Vance mysonisalawyer - Play as Ken Rosenberg looklikehilary - Play as Hilary King rockandrollman - Play as Love Fist character (Jezz
Torent) weloveourdick - Play as Love Fist character (Dick)
onearmedbandit - Play as Phil Cassidy idonthavethemoneysonny - Play as Sonny Forelli foxylittlething - Play as Mercedes
Grand Theft Auto Vice City Walkthroughs
Video walkthroughs are a great tool if you're stuck on a certain
mission or boss fight, the Grand Theft Auto Vice City walkthrough videos
offer of some good tips and advice for making it through the missions
in the game.
GLOBLACKBERRY SUBSCRIPTION CODES AND PLANS -
Globacom Nigeria just has it N1400 monthly Blackberry plan data to be
3GB again, Glo Comonth Blackberry plan which was originally 3GB of data
was suddenly reduced to 1.5GB of data few months ago.
As
we all know after the kick-off of Mobile number portability in
Nigeria there have been a lot of competitions among the
Telecommunication providers in the country.First Etisalat started with a
N1000 naira Monthly Blackberry plan with unlimited data, MTN followed
with N1000 Naira Blackberry plan with 3GB of data. GLOBLACKBERRY SUBSCRIPTION CODES
AND PLANS - All eyes were on GLO who offers the same blackberry plan
for N1400 with a data of 1.5GB, so I think this is one of the positive
side of Mobile Number portability. SEE MORE AFTER CUT>>>
All Blackberry Data Bundle Plans for Glo Nigeria and their Subscription Codes
Glo Blackberry Internet Services
Validity Period
Price
USSD Code
SMS Code
Glo BIS Daily
1 Days
N300
SMS “BISday” to 777
Glo BIS Weekly
7 Days
N900
SMS “BISweek” to 777
Glo BIS Monthly
30 Days
N2,800
SMS “BISmonth” to 777
Glo Complete Weekly
7 Days
N400
SMS “Coweek” to 777
Glo Complete Monthly
30 Days
N1,400
SMS “Comonth” to 777
Above is the complete list of all blackberry plans for your Glo line. How to check your blackberry plan expiry date on glo is quite simple. Simply SMS “status” to “777” and that’s it. GLOBLACKBERRY SUBSCRIPTION CODES AND PLANS
Quick fixes for problems in XP, Vista and Windows 7
It's a sad fact of life that no Windows PC performs faultlessly over
time. Many of these problems are outside your control, but others can be
introduced through user error.
It doesn't matter how much
simpler Microsoft makes Windows with each successive release: problems,
glitches and bugs will always be a part of it.
Each month PC
magazine from Future Publishing answer dozens of reader questions, so
we've trawled our extensive archives and dug out 52 of the most relevant
fixes to Windows problems.
Where possible we avoid referring to
software that promises to fix these; these "miracle" cures often
introduce problems of their own. Instead we try to concentrate on
explaining how to fix various problems using only the tools in Windows
itself. 01. Missing Taskbar icons Version: XP, Vista, 7
If
icons have disappeared from the Taskbar's notification area, there are
two things to try: first, press the Windows key and [R], type "regedit"
and press [Enter].
Browse
to HKEY_CURRENT_USER\ Software\Classes\Local
Settings\Software\Microsoft\Windows\ CurrentVersion\TrayNotify, and
delete both IconStreams and PastIconsStream values.
Reboot, or
log off and back on again. If the problem persists in XP, and you can
live without it, open the Add or Remove Programs Control Panel, click
Add/Remove Windows Components, expand Networking Services, and untick
"UPnP User Interface". Then click OK > Next. 02. PC won't sleep Version: XP, Vista, 7
If
your PC won't stay asleep it's often because a device is configured to
bring it out of standby when triggered. Identify the culprit by pressing
the Windows key and [R], type "cmd" and press [Enter].
Type the following line and press [Enter]: powercfg –devicequery wake_armed
Now press the Windows key and [R] again, but this time type "devmgmt.msc"
to open Device Manager. Find any devices listed earlier, then
double-click them and look for an Advanced or Power Management tab.
Check
if the device is allowed to bring the PC out of standby – if it is,
untick all the boxes that wake it. Click OK, close Device Manager and
test it worked; repeat the process if necessary. 03. Quick fixes Version: XP, Vista, 7
Microsoft
has developed the Fix It Center tool, which includes all of the
automated fixes for various Windows problems it has released over the
last few years. Download and install it from http:// fixitcenter.support.microsoft.com, then launch the tool from its desktop shortcut.
A
list of available troubleshooters for your version of Windows will be
listed; if one describes the problem you're having then click the Run
button next to it and see if it can resolve your problem. 04. Remove printer drivers Version: XP, Vista
To
ensure all traces of an old printer are removed from your PC, open
Printers or Printers and Faxes. Right-click blank space in the Printers
Control Panel and choose Server Properties (in XP) or Run as
Administrator > Server Properties > Continue (in Vista).
Switch
to the Driver tab – if your driver is still present, select it and
click Remove. If you're using Vista you should leave "Remove driver
only" selected only if the drivers were provided by Windows. Click OK
followed by Yes > Close. 05. Verify system files Version: XP, Vista, 7
The
System File Checker (SFC) tool enables you to scan for – and replace –
corrupt and missing fi les. If you use XP you can use it to scan your
entire drive, while in Vista and Windows 7 it can verify individual fi
les and folders too. If you have an installation CD, keep it handy in
case it's needed. Step 1. In Windows XP
Click
Start > Run, type "sfc /scannow" and press [Enter] to check your
entire drive for errors. Have your installation CD handy in case you're
asked for it. Step 2. Vista and Windows 7
Click Start, type "cmd", then right-click cmd.exe and choose Run as Administrator > Continue. Type "sfc /scannow" and press [Enter] to check your entire drive. Step 3. Scan and replace
Alternatively,
type "sfc /SCANFILE=path \fi lename" and press [Enter], replacing
path\fi lename with your chosen fi le – such as
c:\windows\system32\riched32.dll. 06. Program compatibility problems Version: XP, Vista, 7
If
you have issues with a program check its website or Google the
program's name, version number and your version of Windows to see if
there are any issues with it.
Avoid
installing system software not listed as compatible with your version
of Windows, otherwise try installing it as normal; if it fails, Windows 7
may offer to apply compatibility settings to it – see if these work.
If
the program installs but won't run, right-click its program shortcut
and choose Properties > Compatibility Settings. Select your old
version of Windows from the list and click OK.
If this fails, try
ticking "Run this program as an administrator"; in Windows 7 you can
also click "Help me choose the settings" to gain access to the Program
Compatibility Troubleshooter. 07. PC keeps rebooting after Windows Update Version: XP, Vista, 7
If
your PC gets stuck in a cycle of rebooting during the update process,
you need to undo the updates using System Restore. If your computer came
without a Windows disc, look for an option to access recovery options,
or tap [F8] before Windows starts loading, and then choose "Repair your
computer".
If you have an installation disc, boot from it, select
your language and then choose "Repair your computer". In both cases,
when the menu appears, choose System Restore to undo the update. 08. System Restore not working Version: XP, Vista, 7
If
you're having problems restoring your computer to an earlier state, try
booting into Safe Mode (tap [F8] as your PC restarts) and running
System Restore from there.
In Vista and Windows 7 there's also
another option: you can also run the tool directly from your Windows
disc (see tip seven, above) if you can't access Windows. 09. Windows Media Player missing songs Version: XP, Vista, 7
Tracks
missing from Windows Media Player? Try clicking Start > All Programs
> Accessories. If you're using XP you should select the Command
Prompt, or in Vista or Windows 7 right-click it and choose Run as
Administrator.
Switch to the folder containing your music using the cd command (for example, cd music cd my documents\my music), then type "attrib -s *.* /d /s" and press [Enter].
Once
complete, open Media Player and press [F3], or choose Tools >
Advanced > Restore Media Library (in Windows 7) to access all your
music again. 10. Action Center Version: 7
Click
the flag icon in the Taskbar's notification area to access the Action
Center. Here you can get an at-a-glance look at problems, plus launch a
series of troubleshooters to help quickly fix the problems that plague
you, without getting your hands dirty. 11. Show printer ink levels Version: XP, Vista, 7
If
you've just upgraded to a new version of Windows and can't access your
printer's ink levels, the bad news is that Windows installed a basic
driver without the function.
Check the manufacturer's site for a dedicated driver and – if it exists – install that. 12. Fix Windows driver problems Version: XP, Vista, 7
Most
hardware problems can be traced to the drivers, the software that
enables them to work with Windows. When it comes to tracking down
problems, the first port of call should be Windows' own Device Manager –
here's how to troubleshoot problems using this useful tool. Step 1. Open Device Manager
Press
[Windows] + [R], type "devmgmt. msc" and press [Enter]. Look for yellow
exclamation marks next to troublesome hardware devices and double-click
one. Step 2.Get error details
Look
on the General tab for an error code and description of the problem –
if a troubleshoot button is present, click it to see if you can fi x the
problem easily. Step 3.Search online
If
no fix is forthcoming, use the error details as part of your web search
– try a general search first, then add your hardware's make and model
if necessary. 13. Resolve ReadyBoost conflict Version: Vista, 7
Your
PC can only use one ReadyBoost device at a time, and some computers
come with built-in flash memory already configured for use with
ReadyBoost.
To resolve this conflict click Start, rightclick
Computer and select Manage, then under Storage choose "Disk Management"
to verify the existence of such a drive. Look for a program called Intel
Turbo Memory Console (type "Intel" into the Start menu's Search box)
and open this to disable the built-in drive in favour of your own. 14. Folder settings not remembered Version: XP, Vista, 7
If
you find you can no longer customise folders to look and behave how you
want, the solution involves some editing of with two Registry subkeys –
BagMRU and Bags – which are found in two separate locations: Shell and
ShellNoRoam under HKEY_ CURRENT_USER\Software\ Microsoft\Windows.
Think
this sounds like too much hassle? No problem, just open the Microsoft
Fix It Center tool (see tip three) and run the "Diagnose and repair
Windows Files and Folder Problems" wizard. This will do the hard work
for you. 15. PC keeps rebooting Version: XP, Vista, 7
If
your PC restarts unexpectedly after briefly displaying a blue screen,
then it's encountered a STOP error. If this keeps occurring you need to
identify it.
In
Vista and Windows 7 you can stop Windows automatically restarting from
the Windows boot menu that should appear; if you use XP click Start,
right-click My Computer and select Properties > Advanced tab. Click
Settings under "Startup and Recovery" and untick "Automatically restart"
before clicking OK twice.
Now when the STOP error occurs you'll
see a blue screen with details of the error message; note down the
description, any files it refers to, and the STOP error code. Then
search the web for these terms to hopefully find a solution. 16. Blocked startup programs Version: XP, Vista, 7
If
you get this message after starting Windows, it means one of the
programs set to start with it is attempting to work with elevated
privileges. This is symptomatic of older programs, so either source an
update or an alternative program if you can.
Right-click the
message, choose "Run blocked program" and select the errant tool in
question. Then click Continue when prompted. 17. Fix file-sharing problems Version: XP, Vista, 7
Verify
your PCs are on the same network – wireless or wired – and all on the
same workgroup (click Start, right-click Computer and select Properties;
in XP you need the Computer Name tab). Is File and Printer Sharing
enabled?
Check
from the Network and Sharing Center in Vista/Windows 7 – ensure your
network is Home or Work. In Windows 7 click Choose homegroup and sharing
options > Change advanced sharing settings; in XP right-click a
folder and choose Properties > Sharing tab.
Disable password
protected filesharing in Vista or Windows 7 if sharing with PCs running
XP, and check your firewall has placed your network in a trusted zone. 18. Access denied error on system files Version: XP
Not
long ago dealing with "access denied" errors relating to system files
or the Registry involved downloading a tool and typing out a complex
script.
Now you can resolve this issue – sometimes found when installing SP3 – by downloading a dedicated fix-it tool from http://go.microsoft.com/?linkid=9730795. 19. Low memory error Version: XP, Vista, 7
Fix
this problem by making sure Windows is set to handle your virtual
memory settings; open the System Control Panel and either click
"Advanced system settings" or switch to the Advanced tab.
Then
under Performance click Settings, select Advanced and click Change. You
need to verify that either "Automatically manage paging file for all
drives" (in Vista or Windows 7) or "System managed size" (in Windows XP)
is selected, then if necessary click Set > OK, rebooting when
prompted. 20. No sound in Windows Version: XP, Vista, 7
Before running the Microsoft Fix It Center tool (see tip three), open the "Sound" or "Sounds and Audio Devices" Control Panel.
Select
the Playback or Audio tab, and verify the device is set to be the
default; if not, select it from the list to fix the problem. 21. Create a repair disc Version: 7
If your PC didn't come with a Windows installation disc, click Start, type "backup" and click Backup and Restore.
Select "Create a system repair disc" and put a blank CD or DVD in your
writeable drive to create a bootable disc with the "Repair your
computer" options on it. 22. Where's GPEDIT? Version: XP, Vista
If you're running one of the Home editions of Windows, you'll find the gpedit.msc tool is missing. If you're instructed to fix a problem using this tool and you're running Windows XP, visit here to find the equivalent setting in the Registry.
Alternatively, for the Home edition of Vista you can download an Excel spreadsheet with the various settings from here. 23. System Restore problems Version: XP, Vista, 7
Restore
points are cumulative in reverse – each new one only saves what's
changed – so old points rely on newer ones to work; if one corrupts then
all older ones are lost. That means the older a Restore point, the less
reliable it is, so avoid using anything but the most recent one.
Open
Disk Cleanup (Start > All Programs > Accessories > System
tools) and – if prompted – choose "all users". On the More Options tab
delete all but the newest Restore point. If all else fails, disable
System Restore and lose all Restore points, then re-enable it.
For XP use the tool here;
in Vista and Windows 7 open System Protection, untick all the boxes and
click Turn off System Restore > Apply. Tick your system drive again
and click Apply to switch it back on.
If you're plagued with specific error messages, or System Restore doesn't work well, you'll find useful solutions here. 24. Text too small Version: XP, Vista, 7
If
you're struggling to read the text on your screen simply right-click
the desktop and choose "Personalization" or "Properties". In Windows 7
click Display, or in Vista select "Adjust font size (DPI)"; in XP switch
to the Settings tab and click Advanced.
Select a larger size to
suit you and click OK twice followed by Yes > Close, rebooting if
prompted. Certain programs will throw up warnings – in Vista and Windows
7 you can right-click the program shortcut and choose Properties >
Compatibility tab, then tick "Disable display scaling on high DPI
settings". 25. Video display problems Version: XP, Vista, 7
When
playing back video on your PC, does the screen appear too light or
dark, or is the colour balance all wrong? That's because the video uses
special "overlay" settings in place of Windows' own.
To
resolve this, right-click the desktop and look for an Nvidia or ATI
option; if it's not there, choose "Personalization" or "Properties"
instead. Choose Settings or Display Settings and look on the tabs for a
video or advanced option.
Once located, make sure the video
settings are set to that of the player, and not your graphics adaptor.
When this is done, save your settings to resolve the problem. 26. Use Event Viewer Version: Vista, 7
Windows
records all major events, including errors and warnings, which can be
accessed for troubleshooting. Press the Windows key and [R], type "eventvwr.msc" and press [Enter]. Now expand Windows Logs and click on a log.
Click
Filter Current Log, tick Critical, Error and Warning and click OK.
Click an event that occurred around the time of your problem: each event
will provide more information about your problem – if there's a link to
more help online, select it.
Some events won't produce any extra
information, but many will; you may even get possible solutions to try,
but if not, make a note of any extra detail to use in a Google search. 27. Fix Reliability Monitor not working Version: Vista
If
Reliability Monitor stops updating, open Event Viewer (see tip 26),
expand Windows Logs, right-click System and choose Clear Log > Clear.
Launch Task Scheduler from the Start menu's Search box,
select View > Show Hidden Tasks, then expand Task Scheduler Library
> Microsoft > Windows > RAC.
With RAC selected,
right-click RACAgent in the middle pane and select Run. Its status
should then change to Running, indicating that the Reliability Monitor
is working correctly once again. 28. Event Viewer and XP
Version: XP
Open Event
Viewer as outlined in tip 26, then select a log from the left-hand list
(System or Application are the best to try) and choose View > Filter.
Untick Information, then click OK to leave all warnings
and errors listed. Now review the logs and see what's happening behind
the scenes. 29. Change Safe Mode resolution Version: XP, Vista, 7
A
lot of troubleshooting tasks are performed in Safe Mode, and you'll
probably find that the default resolution (800 x 600) can be a little
cramped to work in.
Thankfully you can force Windows to always display Safe Mode in a higher resolution with a simple tweak. Step 1. Boot into Safe Mode
Restart
your PC and tap [F8]. When prompted, choose Safe Mode, then log into
your user account when prompted. Don't select System Restore if
prompted. Step 2. Access Display Settings
Right-click
the desktop and choose Properties (XP) or Personalize (Vista and
Windows 7). Select Display Settings, then Advanced > Adapter tab >
List All Modes. 3. Try new resolution
Select
a higher resolution from the list and click OK > Apply. If the
screen is readable click OK; click "List All Modes" again to select
another option. 30. Delete wireless network Version: XP, Vista, 7
If you need to delete existing settings for your Wi-Fi network, what do you do?
In
Vista and Windows 7 you should open the Network and Sharing Center and
click "Manage wireless networks", then select an entry and click Remove.
If you're running XP and using Windows to manage your
wireless networks click "Change the order of preferred networks" to
remove unwanted networks. 31. Preparing your desktop Version: Vista, 7
Sometimes
Windows messes up when it logs on to your user account – the "Preparing
your desktop" message is a giveaway it's setting up a temporary user
profile.
Try pressing [Ctrl] + [Alt] + [Del] at this
point – if you're lucky, you can log off and try to log on again. This
error can occur if you try to log on too quickly after the Windows
Welcome screen; wait ten seconds before entering your password and
hitting [Enter]. 32. Windows won't start Version: Vista, 7
If
you find Windows won't load, pop your Windows installation disc into
the drive and restart your computer. Then select to boot from CD when
prompted. Pick your language, click Next, and then choose "Repair your
computer".
Windows will attempt to detect your
installation – if it's successful, click "Startup Repair" to enable
Windows to try and fix the problem. The repair isn't always successful
the first time, so if Windows still won't load try the process again to
see if it can now resolve your issue. 33. Sort Start menu Version: XP
Noticed how Windows XP "forgets" to keep the Start menu in order?
To
fix this, click Start > All Programs, then right-click and choose
"Sort by Name" one last time. Then open Registry Editor and browse to
HKEY_CURRENT_USER\Software\Microsoft\Windows\
CurrentVersion\Explorer\MenuOrder.
With MenuOrder
selected, choose Edit > Permissions. Click the Advanced button and
remove the tick next to "Inherit from parent the permission entries…".
When prompted click Copy > OK, to close the Advanced Security
Settings window.
Now select your username from the list
and untick the "Allow" box next to Full Control (leave "Read" ticked)
and click Apply. Select the Administrators group and repeat the steps.
Finally, click OK and close the Registry Editor. 34. File opens with wrong program Version: XP, Vista, 7
If
a particular type of file no longer opens in the correct program,
right-click the file in question and then simply select Open with >
Choose Program.
Select your chosen program from the list
(click Browse if it's missing), and make sure "Always use the selected
program..." is ticked. Then click OK; this will save your preference
whenever you open files of that type. 35. Can't see mouse cursor in Media Center Version: Vista, 7
If
the mouse cursor doesn't appear in Windows Media Center in full-screen
mode, you simply need to disable mouse trails to get it back again.
Open the Mouse Control Panel, switch to the Pointer Options tab, then
untick the option of "Display pointer trails" and click OK to save it. 36. User account corrupted Version: XP
If
your user account corrupts – if you're unable to log on to it, or
Windows always creates a temporary user profile – then you'll need to
follow a different technique to that described in the next tip to
resolve the problem. Visit http://support.microsoft.com/kb/811151 for a guide to doing so. 37. Transfer user account Version: XP, Vista, 7
To
transfer files and settings to a new user account , restart your PC and
tap [F8] for the boot menu, pick Safe Mode and press [Enter] twice.
Log
on as the master Administrator account (click Yes if prompted) then
open the User Accounts Control Panel and create a new user account with
administrator privileges. Click Start, log off, and log on to your new
account to set it up; once complete, log off again and log back on as
the Administrator.
Click Start, right-click Computer,
and either click Properties > Advanced system settings (Vista/Windows
7) or select Properties > Advanced tab. Click Settings under User
Profiles, pick your existing user profile and click Copy To.
Click
Browse to select your new user folder under C:\Users or C:\Documents
and Settings. Click OK twice, read the warning and click Yes. Your old
user profile's settings and files will be copied to your new one, then
reboot in normal mode and log on as your new profile. 38. Safely Remove Hardware glitch Version: XP, Vista, 7
If
your internal drive is incorrectly listed as one of the options under
the Safely Remove Hardware icon, it's a glitch that only affects certain
motherboards, including many with Nvidia chipsets.
Thankfully,
you can remove your internal drive's entry with a simple Registry
tweak. Open the Registry Editor, browse to
HKEY_LOCAL_MACHINE\SYSTEM\CurrentControlSet\Services\nvata, and then
select Edit > New > DWORD value.
Type
"DisableRemovable" into the New Value #1 box, then press [Enter] and
double-click "DisableRemovable". Change its value to 1, restart your
computer and the glitch will be gone. 39. Problem Reports and Solutions Tool Version: Vista
There's
no Action Center in Vista, but there is this tool: type "problem" into
the Start menu's Search box to use it. Click "View Problem History" to
see a list of all current and past problems. Click OK and click "Check
for new solutions" under Tasks.
Vista
will upload all of the problems listed – if prompted, send more
information, which may help provide a solution. If you're lucky, you'll
be told solutions have been found; click one to review its findings –
you may be told to download an update, take a specific course of action,
or go to another site for more help. 40. Clear print queue Version: XP, Vista, 7
To
clear the print queue try double-clicking your printer under Printers
and Faxes (Devices and Printers in Windows 7) and choosing Printer >
Cancel all Documents (or Purge all Documents); if that doesn't work, and
neither does switching the printer off for a few minutes, try the
following.
Press the Windows key and [R], type "services.msc"
and press [Enter]. Right-click Print Spooler, and select Stop. Open
C:\Windows\ System32\spool\PRINTERS and delete its contents.
Right-click Print Spooler again, and choose Start. 41. Help and Support won't open Version: XP
First try clicking Start > Run, type "helpctr –regserver" and press [Enter]. If this fails, download and run a VBS script from here to reset the Help and Support's Registry files.
If this also fails, click Start > Run again, type "regsvr32/uhhctrl.ocx" and press [Enter].
The next step is to reinstall Help and Support: click Start > Run, type "%windir%\inf" and press [Enter], then right-click pchealth.inf and choose Install; you may need your Windows CD.
If after all of this you still can't get the Help and Support Service to work, visit www.kellys-korner-xp.com/top10faqs2.htm. It has even more techniques to try, depending on the kind of error you're getting. 42. Double-click opens Search Version: XP, Vista, 7
Can't
open a drive by doubleclicking it? Right-click the C: drive and check
that the Search option is in bold, which indicates it's the default
choice.
The fix is mercifully simple: click Start > Run, type "regsvr32/i shell32.dll" and press [Enter]. 43. CD/DVD drive problems Version: XP, Vista, 7
Many
disc problems can be traced to third-party disc-burning software. If
you've recently installed a new program, try removing it and see if the
issue is resolved. Conversely, if you've recently removed a program,
check the program's website to see if a clean-up tool might be able to
help.
For example, the Nero General Clean Tool
might solve things. If all else fails, just run the Microsoft Fix It
Center tool, select "Playing and burning CDs, DVDs, and Blu-ray Discs"
and click Run. This should resolve most outstanding burning issues. 44. Second monitor is blank Version: XP, Vista, 7
If
you attach a second display to your PC but it appears to be blank, try
moving your mouse on to it. If it then appears, open your display
properties (see tip 25) and look for the multiple displays section; make
sure your displays are set to duplicate each other, not extend. 45. Sticky keys Version: XP, Vista, 7
If
certain keys such as [Shift] start behaving strangely, you may have
inadvertently switched on one of Windows' accessibility options such as
Sticky Keys. Type "accessibility" into the Search box or open
Accessibility Options to switch it off and regain control. 46. Unmountable boot volume Version: XP
This
error can spell the death of your current Windows installation, but you
might be able to fix it if you have a Windows XP installation disc. If
you do have this disc, boot from it and choose the Recovery Console
option when prompted.
If asked, press [1] to log on to
the current Windows installation and press [Enter], then press [Enter]
again when prompted for a password.
Once the command
prompt appears, type "chkdsk /r" and press [Enter] to let Windows check
for errors and see if it can fix them. If it finds and fixes errors, you
should be able to boot into Windows once again. 47. Remove restrictions Version: XP, Vista, 7
Sometimes
you may find yourself locked out of vital parts of your system, such as
Task Manager and Registry Editor. The simplest way to resolve these
restrictions is to use Virus Effect Remover.
Although
designed to undo the damage left behind by viruses, it can also restore
access to system tools you've been denied access to for other reasons.
Install it in Safe Mode if necessary, then run the tool and click the
fix you need. 48. Can't copy to memory card Version: XP, Vista, 7
If
you get an "0x80070052: the directory or file cannot be created" error
message when you're trying to copy files to a memory card, you need to
back up the data on it and format it. Then create new a folder into
which all your files should then be copied. 49. Program help not working Version: Vista, 7
Some older programs use an outdated version of the Windows Help program, which isn't in Vista or Windows 7 by default.
If you can't open a program's Help file, you should be pointed to download the files you need; if not visit http://support.microsoft.com/kb/917607. 50. Windows Update won't install Version: XP, Vista, 7
If a single update won't install or keeps appearing as an update, make a note of its KB number. Go to www.microsoft.com/downloads and type the KB number into the Search box to locate the standalone installer.
Save
this to your hard drive, reboot into Safe Mode and attempt to install
the update from there. In most cases the update will now install
successfully and you'll not be prompted for it again. 51. Problem Steps Recorder Version: 7
Need
to demonstrate your problem to an expert or friend? Click Start, type
"problem steps" into the Search box and click "Record steps to reproduce
a problem".
This tool enables you to record what you're doing on your PC, which can then be sent on to someone else to get their help. 52. PC won't shut down
Most
shutdown problems are fixed in Windows updates or Service Packs, so
check you're up-to-date before troubleshooting. Then try to identify
what exactly causes Windows to hang; if you can find a process or
program, close it manually (using Task Manager if necessary) to verify
it's the culprit, then search the web for a possible fix or update.
If it starts with Windows, disable it. If you can't identify the culprit, visit http://support.microsoft.com/kb/308029 for an advanced guide; the instructions are written for XP, but many can be applied to Vista and Windows 7 too.
 September 19, 2014 at 04:05 PM

 If you would like to use a more expansive color picker, simply double
click the the foreground color box, and you'll be presented with a much
more advanced color creating tool to work with. Within the Color
Picker, you'll be able to create your custom color and save it to your
swatches for future use.
If you would like to use a more expansive color picker, simply double
click the the foreground color box, and you'll be presented with a much
more advanced color creating tool to work with. Within the Color
Picker, you'll be able to create your custom color and save it to your
swatches for future use. Tip: Take your company colors and save them as
“Swatches” so that you can reference and reuse them whenever you’re
designing your visual content.
Tip: Take your company colors and save them as
“Swatches” so that you can reference and reuse them whenever you’re
designing your visual content.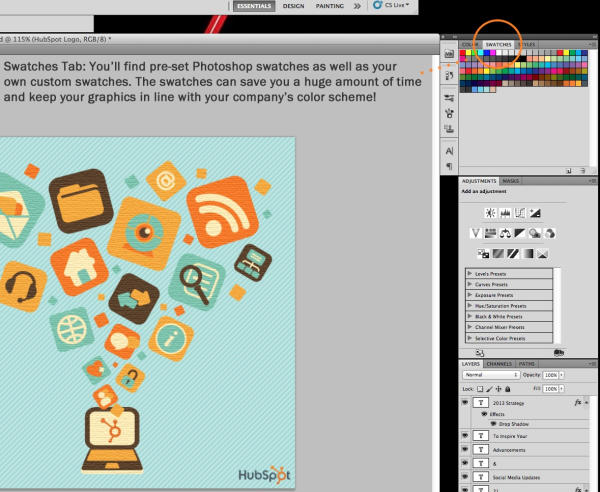


 Tip: To select your entire graphic and include all
layers, highlight all layers and then use the Select tool. Once you've
determined the area to copy, use the menu bar at the top and click
"Edit," >> "Copy Merged." This will copy the entire graphic so you
can paste it as its own layer.
Tip: To select your entire graphic and include all
layers, highlight all layers and then use the Select tool. Once you've
determined the area to copy, use the menu bar at the top and click
"Edit," >> "Copy Merged." This will copy the entire graphic so you
can paste it as its own layer.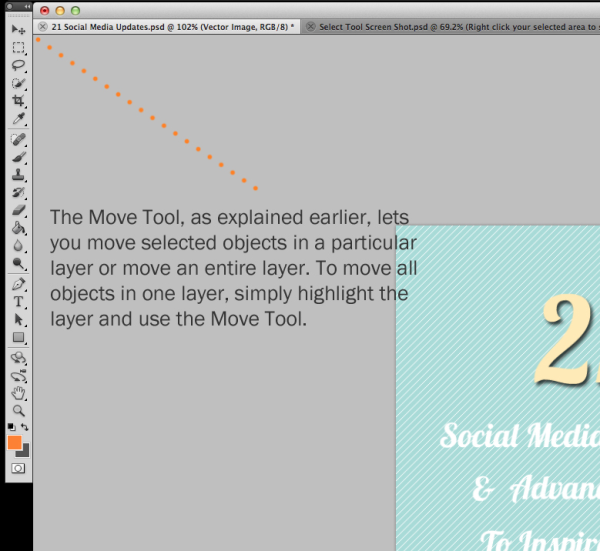 Tip: Use the shortcut CTRL + T or Command + T
(for Macs) to initiate Free Transform. This will let you scale, rotate,
move, and flip any element in your selected layer or layers. Hold the SHIFT key while transforming to maintain the proportions of your elements.
Tip: Use the shortcut CTRL + T or Command + T
(for Macs) to initiate Free Transform. This will let you scale, rotate,
move, and flip any element in your selected layer or layers. Hold the SHIFT key while transforming to maintain the proportions of your elements.

 Tip: Don’t expect a perfect selection each time.
Sometimes the Magnetic Lasso may mistake shadows or textures as part of
your object, and cut off pieces of your object. If you can afford some
extra space around the object, use the Lasso Tool instead and erase the
unwanted selections afterwards.
Tip: Don’t expect a perfect selection each time.
Sometimes the Magnetic Lasso may mistake shadows or textures as part of
your object, and cut off pieces of your object. If you can afford some
extra space around the object, use the Lasso Tool instead and erase the
unwanted selections afterwards.


 With the variety of options available, you can achieve a number of
great effects to finalize your graphics. Have fun with these and
experiment on different layers, images, and texts.
With the variety of options available, you can achieve a number of
great effects to finalize your graphics. Have fun with these and
experiment on different layers, images, and texts.


